The following instructions will guide you to correctly format a creditor matrix and save it as a .txt file.
A creditor matrix contains each creditors name and mailing address. This information is used for noticing and also for claims information when applicable. The creditor matrix must be in ASCII file format with an appropriate text extension such as .txt before it can be successfully uploaded into the ECF system. The creditor list is to be submitted through the ECF system at the time of case filing. If additional creditors need to be added, an Amended List of Creditors should be uploaded directly through the ECF System.
Creditor Matrix Specifications
- The name and address of each creditor must be five (5) lines or fewer.
- Each line may contain no more than 40 characters including blanks.
- Names and addresses should be left justified (no leading spaces).
- If attention lines are used, they should appear on the second line of the address.
- City, state and ZIP code must be on the last line.
- All states must be two-letter abbreviations
- If a nine-digit ZIP code is used, a hyphen must separate the first five digits from the last four digits.
- Each creditor must be separated by at least one blank line.
- Do not include case number, page numbers, line numbers, headers, footers, etc. in the document.
To Save the Creditor Matrix File with a .txt Extension
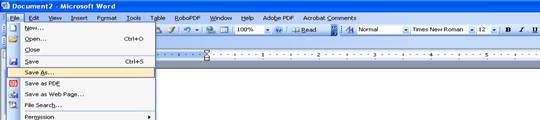
Step 1: After creating the creditor list in WordPerfect or Microsoft Word, open the file. Click on File in the toolbar to display the drop down list. (See Figure 1)

Step 2: Click Save As in the drop down list (See Figure 2).
If in Microsoft Word, skip to Step 4. If in WordPerfect, continue to Step 3.
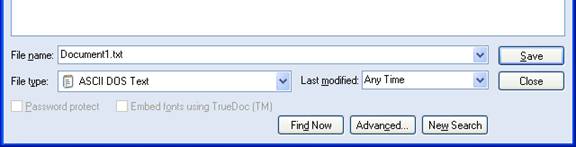
Step 3: If in WordPerfect, click the drop down menu arrow in the File Type box (See Figure 3). Select the file type ASCII DOS Text.
Step 4: If in Microsoft Word, click on the drop down box arrow in the Save As Type box (See Figure 4). Select the file type of Text Files (*.txt) or Text Only (*.txt).

Step 5: Enter the file name in the File Name box.
Step 6: Click the Save button.